Helpful to know
Here you will find the most important things to feel comfortable in the house and to get along.
- Gas stove
- Mosquito nets
- Fans
- Sockets next to the bed
- Lights in front of the house
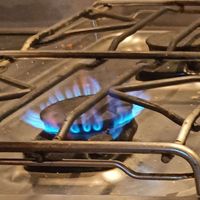
Gas stove
The gas stove is lit using a spark lighter, match or lighter. The gas stove has a pilot flame. This must be lit in order to turn on the main flame. Each main flame has its own pilot flame that can remain on while cooking, allowing one to quickly turn the individual flames off and on again. The main flame cannot be lit directly. This can only be done via the pilot flame.
The pilot flame is ignited by pressing the knob on the stove and turning it about half a cm to the left on the star. -> Keep the button pressed. -> Ignite the pilot flame and keep the knob pressed for another 3-10 sec.
To ignite the main flame, slowly release the knob. When the pilot light stays on, the main flame can be used by turning the knob further to the left on the flame.
The stove works with gas from gas bottles. Basically everything should work. But if the gas is empty, please switch to the new gas bottle. (How to switch gas bottles).

Video instructions how to start the fire: Click here
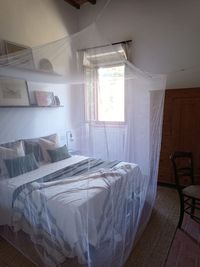
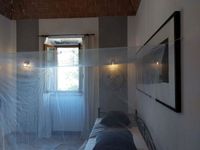
Mosquito nets
Most of the time you can get by without mosquito nets, however there are times when a mosquito net makes sleeping much more comfortable.
Each bedroom has its own mosquito net, which can also be used only for that particular bedroom, as the hooks are adapted to the bedroom and the bed. Around the bed (wall, closet, ...) hooks are mounted at about 2m height to hang the mosquito net easily and uncomplizirt.
To facilitate the attachment of the mosquito net and the hooks in the wall are colored markings. Simply connect the same color hooks.
Make sure that the mosquito net reaches to the floor on all sides of the bed. Please do not change the mosquito net between rooms.
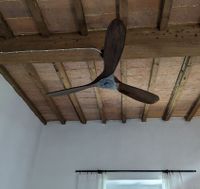
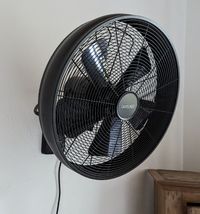
Fans
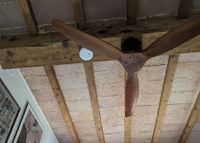
We have ceiling fans in 4 bedrooms. We have wall fans in the 2 bedrooms with the historic domed ceiling.
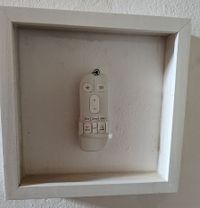
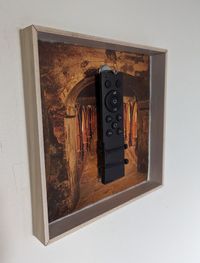
The remote controls are attached to the wall. Firstly, so that they don't break and secondly, so that they don't get lost. The remote controls must not be removed and must remain mounted on the wall. Without the remote control, the entire ceiling fan will no longer work and will have to be completely replaced.
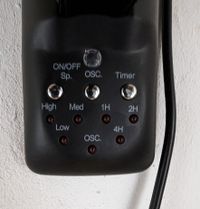
The ceiling fan in bedroom 1 has a white remote control. To switch it on (and off), press the button with the star at the top left. Then press the "+" or "-" button to set the wind speed. If a timer is required, simply select the button with the corresponding number of hours. The summer or winter button at the bottom of the remote control changes the direction of rotation. If there is not enough wind, you can check whether the fan is turning the right way round (summer).
The ceiling fans in bedrooms 2 to 4 have a black remote control. To switch on, press the button in the middle of the circle and then press up on the outer ring around the switch-on button to increase the speed or down to decrease the speed. The buttons with the hours (1, 2, 4 or 8) are the timer buttons. The button with the two round arrows forming a circle changes the direction of rotation from summer to winter mode. If the wind is not strong enough, the direction of rotation is probably set to winter.
We have wall fans in bedrooms 4 and 5 because of the historic domed ceilings. The angle of inclination can be adjusted manually by pressing the fan slightly downwards or upwards. The fan has 3 buttons. The left button switches the fan on. By pressing it again, it changes from slow to medium, then to strong and then to off. The middle button switches the lateral rotation on or off. The right button can be used to set the timer. Press again to change the time.
Video instructions for the Fan in Room 1: Click here
Video instructions tor the Fan in Rooms 2, 3 and 4: Click here
Video instructions for the Fan at the wall: Click here
Sockets next to the bed
Next to the beds are sockets with built-in USB ports. The sockets have a small blue light in the middle of the front. This indicates that they are switched on. If the sockets do not work or the blue light does not light up, the small toggle switch on the underside of the socket may be switched off. Normally, the sockets should always be switched on.
Video instructions for switching the socket on and off: Click here
Lighs in front of the house


The fairy lights in front of the house are controlled in bedroom 4. It works via a smart home socket. If the preset times are not suitable, a small button can be pressed on the smart home socket to switch the fairy lights on and off.